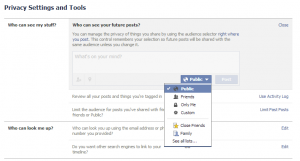
 Managing what is private and what is public on Facebook is a matter of concern to an author. To use your personal profile on Facebook rather than an Author Page, you will need to change your privacy settings to public. Don’t fret. You can still keep those things private that you don’t care to share with the entire world, by using the privacy setting on any status update.
There is another strategy you can deploy on Facebook to keep your public and private life separate on your personal profile. Groups.
Why Create Facebook Groups:
One way to manage the flow of information from public and private sources on your Facebook personal profile (with a privacy setting set on public) is to create one or more groups that help you keep your conversations among subsets of your Friends more organized.
You might create a private Facebook Group for your personal family members.
Or a public Facebook Group for Friends of Jane Austen for those who share your enthusiasm for this classic literary figure. If you belong to more than one tribe, this is one way to keep the conversations in the house going in separate rooms of like-minded Friends.
You can also join Groups. Some are public and welcome new members. Others are private and require you contact the Group Administrator to be added to the group. Within a private group, your status updates are only visible to the group members. As an author you might find Facebook Groups to join based on your genre or subject matter. Some groups have tens of thousands of people who subscribe, while others may have only a handful. Groups take Facebook to a new level of engagement and exposure.
How To Create a Facebook Group:
- Log-in to your profile page.
- On the left side of the page, scroll down until you see ‘Groups’ and then click on the option to ‘Create Group.’
- Enter in a Group Name of your choice. The members of this group should be able to understand what sort of group this is by the name you give it.
- Then add members with whom you are already Facebook Friends. You need at least one member to start. You can add more members later. Since you created the Group, you can manage the membership, adding or subtracting group members over the life of the group.
- Mark your Privacy selection. You can select a private group that only the members can see, or public if you’d like to recruit members to join your online discussions. You can change the privacy settings later if you change your mind.
- Click ‘Create.’
- Choose a fun icon to represent your group, then click ‘Okay’
Your group is now set up and you will be able to see it under the ‘GROUPS’ heading to the left on your profile page. You can click it anytime to read and share info or post to the group.
Enjoy!